
This is my astrophotography rig for deep-sky imaging. The specific items of equipment are listed at the end of this post.
Primary imaging telescope
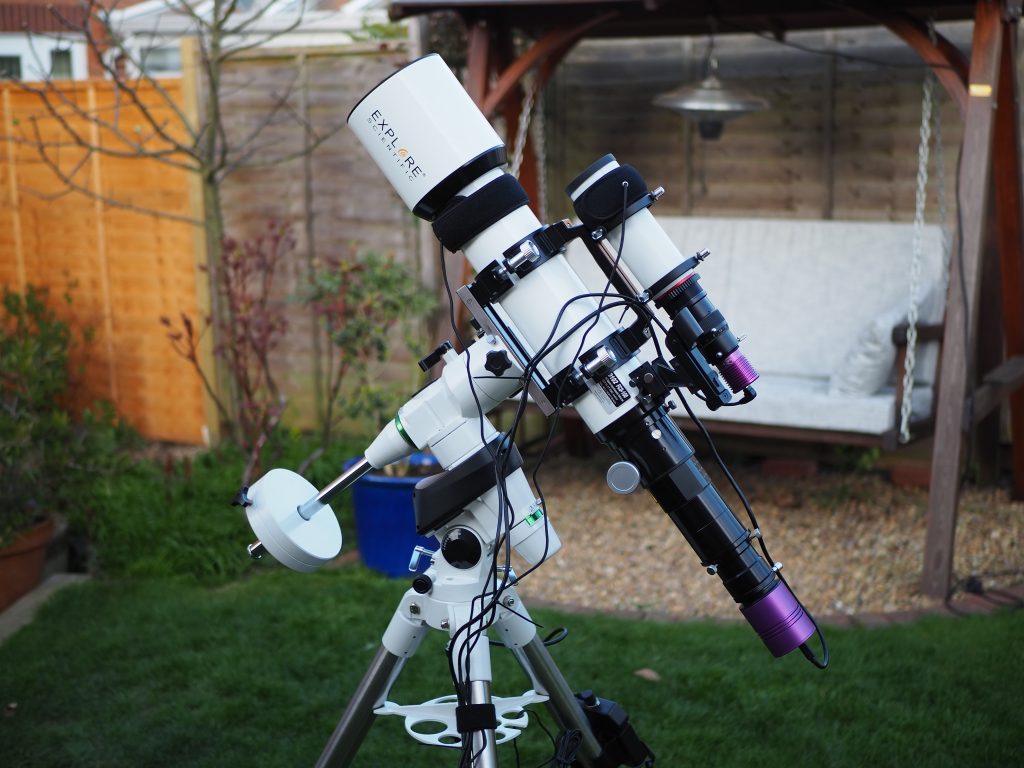
My primary imaging telescope is an Explore Scientific ED 102-mm (4-inch) Apo f/7 refractor. Its focal length is therefore 714 mm. This telescope is an apochromatic refractor with three lenses in its lens cell. It brings three different frequencies to a common focus point, which should give a much ‘cleaner’ view of objects in the night sky (without colour fringing); hence the term, ‘apochromatic refractor’.
Camera
When used with the Altair Hypercam 294C camera, which has a 4/3″ sensor, it gives me a field of view of 77×60 arcminutes (1.3×1 degrees). For context, the diameter of the full moon is about 31 arcmin (0.5 degree). The corresponding pixel scale is about 1.30 arcseconds per pixel, which is about right for ‘OK’ seeing, but slightly undersamples in good or exceptional seeing, reducing the influence of guiding errors and improving signal to noise at the expense of finest detail.
Astrophotography cameras come in colour and monochrome varities. Colour cameras have red, green and blue (RGB) filters over the grid of pixels in a Bayer filter mosaic. Full colour images can therefore be taken in one shot, hence the term, ‘one shot colour’. To make colour images with a monochrome camera, different filters need attaching (e.g. red, green and blue, or narrowband filters like H-alpha or O-III), one at a time for each filter. Each of the resulting monochrome images is then assigned a colour channel and combined into a final colour image. I therefore prefer to use a colour camera as the weather in the UK is usually awful, and time under the stars is so rare. I would rarely or never finish an astrophotography project if I used a monochrome camera. That said, monochrome sensors are more sensitive as they have bigger pixels without the Bayer matrix, and hence fewer frames are needed in comparison to one-shot-colour sensors.


Equatorial mount
The mount is one of the most important items of equipment for astrophotography. It needs to sturdily support the weight of all the mounted equipment, and accurately track with the sky as the earth rotates. My Sky-Watcher EQ5 mount and tripod is rated for a maximum payload of about 9 kg, which reduces to about 6.5 kg for astrophotography. My current set up is about 7.5 kg, so I’m operating as overloaded (it would be an expensive upgrade that I’m not ready for yet). I mitigate this by balancing the mounted equipment very carefully and tying down dangling cables (which are always good things to do). It actually performs surprisingly well.
Guiding
Although the mount tracks in right-ascension at the sidereal rate fairly well, for longer exposures (longer than about 30 s), a closed control loop is required. The guide telescope, mounted on top, exists for that sole purpose. Using the guide telescope and guide camera, I find a suitable star to guide on and then use some brilliant free software called PHD2. This software infers the center of the guide star and sends corrections to the mount to keep the star centered on its initial position. Accurate tracking therefore requires both forward and backward control in both right ascension and declination. This places yet another demand on the mount: Minimal slack in the gearing, which otherwise causes backlash and less effective tracking.
Dew
When an object’s temperature drops below the dew point of the air adjacent to it, water droplets begin to condense out of that air and dew forms on the object’s surface. For astrophotography equipment that is out under the cold night sky, it can radiate out its heat and easily drop its temperature below the dew point, even if the surrounding air temperature is warmer, and so it is particularly susceptible to dew. This is especially true for anything that’s pointing directly up at the sky… like a lens! Dew on a lens has disastrous consequences for image quality, and is not great for the lens either. Amateur astronomers therefore often heat their lenses to keep them above the dew point. There are some very fancy systems out there, but I just use a USB plug and two inexpensive USB heating strips to very gently warm around the lens cells of both the primary imaging telescope and the guide telescope. I’ve not had a dew problem ever since!
Equipment
- Primary Imaging Telescope: Explore Scientific ED 102 mm Apo f/7 refractor
- GoTo Equatorial Mount: Sky-Watcher EQ5 PRO SynScan GOTO equatorial mount
- One-Shot-Colour Camera: Altair Hypercam 294C PRO colour fan-cooled camera
- Guide Telescope: Altair 60mm guide scope
- Guide Camera: Altair GPCAM2 AR0130 mono guide camera
- Dew Heater Temperature Regulator Strip: COOWOO